Tags
build, Christmas, craft, diy, Do it yourself, instructions, manger, moss, nativity, stable, tutorial, wood

“Can we make ’em a home, Momma?”
She asks again. Louder.
I lean out of the laundry.
Nod silent.
The list looms.
Maybe she’ll forget.
Laundry. Crumbs. Dishes. Meals. Mess.
Who has time to make a home for Him.
“There is no room…”
The voice of the innkeeper trailing through the cracked door breaks through the din of thought and I stop.
Just stop.
Maybe we could. Should. Now.
The husband on the other end of the line chuckles and says “sure”, so we bundle warm and rummage through scraps.
Measure. Whack. Grumble. Smile.
I’ve never built anything. Why did I agree to this?
But hope twinkling in those eyes holds me there, hammer in hand, piles all around.

She dances circles when I raise the roof.
She paces while paint dries.
She invites them in.

And again this Christmas, as I pass by it a hundred times a day in the bustle, I’m reminded to stop.
To make a home for Him.
INSTRUCTIONS
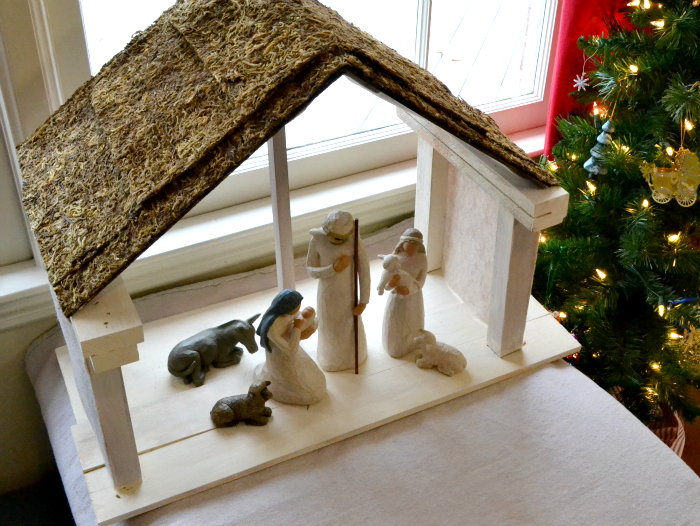
When we set out to construct our stable, I was unable to find much in the way of instructions online so we just gathered what we had and made it work. That being said, I hesitate to even call this a tutorial because I think using what you have on hand is half the fun. However, I have provided some rough measurements in the attachment at the bottom of the post. It’s beginning its second year of use. So far, if has withstood HOURS of play by a four (and now five) year old.
MATERIALS
wood scraps for base and posts
craft wood – two 12″ x 12″ sheets from the craft store (I called it “balsa” in the diagram below…not really balsa though)
felt (from a bolt at the fabric store – not the kind that comes in small sheets)
nails
screws
hot glue gun
moss sheets (8 or 9) – found in the floral section of the craft store
paint
WHAT WE DID…
1. Attach two 9 1/2″ strips of wood to the underside of the floor to raise it a little and add stability.
2. Attach the four upright posts.
3. Attach the center post.
4. Paint the wood. (Optional)
5. While the paint dries, cut your felt to stretch up one side, across the top and down the other. I left it a little long and then cut it once it was in place to be sure I had enough.
5. Lay your felt out flat. With a hot glue gun, attach the two 12″ x 12″ squares of craft wood, side-by-side, to the center of the felt. Be sure that you can bend it to form a peak for the roof before you glue it down. If you have it pulled too tight, it won’t bend.
6. Position the felt and boards on top of the center post. Glue the felt that is hanging down the sides near the tops and the bases of the upright posts to form the walls and secure the roof.
7. Layer the moss sheets to cover the roof and glue into place.

M O R E H O L I D A Y C R A F T S & A C T I V I T I E S . . .
12.12.12 | Make a Garland of Trees
12.7.12 | Color an Advent Calendar
12.4.12 | Make a Button Tree
11.26.12 | Make Oak Leaf Christmas Trees
11.21.12 | Make a Vintage Inspired Advent Calendar

such a beautiful and meaningful story. thank u for sharing.
Thank you, Maria.
Gina–I have gotten LOST in your beautiful blog! It is incredible–an amazingly artistic side of you I am blessed to now know. As a “not-so-crafty” one, I am utterly overwhelmed 🙂 I LOVE all the ideas, and would BUY this “inn” from you if I could (my little Willowtree folks are sadly homeless right now.) You are phenomenally gifted. Love you and our time together.
Thank you, sweet friend!
Pingback: 12 Crafty Nativity Set Tutorials