Tags
calendar, Canvas, chalk, chalk pencil, chalkboard, craft, diy, dowel, make your own, project, transfer, tutorial


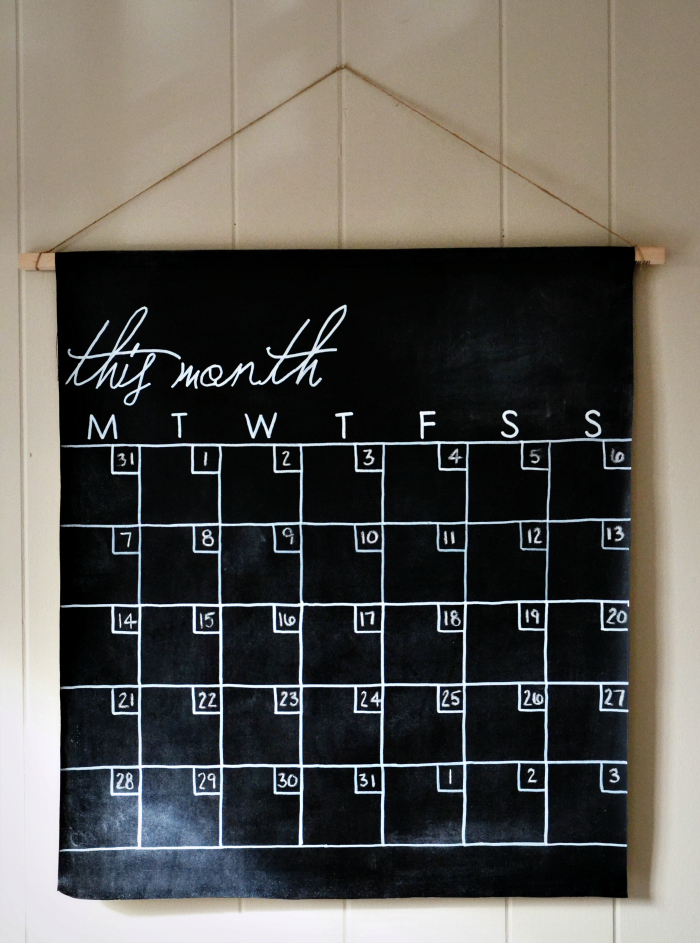
This chalkboard calendar was so much fun and easy as pie to make. If I whipped it up in an afternoon, you can too.
M A T E R I A L S
canvas 29-1/2″ x 21-1/8″ (comes on a long roll at the fabric store…used for making black-out shades)
twine
dowel – mine is squared, not round – 24″ x 1/2″
chalkboard paint
chalk
chalk pencil (optional) – for drawing grid lines
white paint marker
ruler
printer
white paper
black thread
sewing needle


I N S T R U C T I O N S
1. Paint the front side of the canvas with 2 coats of chalkboard paint. Allow to dry between coats. After the second coat, it should be dry to touch. I waited several hours.
2. Create your template. I used Microsoft Word, setting the page margins to .25 (top and bottom) and .13 (left and right).
“this month” font: Jellyka BeesAntique Handwriting…size: 290 (it’s a free download)
days of the week font: century gothic…size: 100 (in Microsoft Word)
3. Print your template.
4. Coat the back side of your template page(s) with white chalk (just in the areas directly behind the print).
5. Using a ruler and a chalk pencil (optional), mark off the grid on your painted canvas for the days of the month. Each of my day squares are 3 inches by 3 inches. The smaller squares (to house the numbers) are 1 inch by 1 inch.
6. Go over the grid lines slowly and carefully using a white paint pen. Allow to dry thoroughly.
7. Place the template for “this month” onto the canvas, right side up, where you would like the letters to appear. Using a pencil, trace over the letters on the template, bearing down firmly enough so that the chalk on the back of the paper transfers to the canvas.
8. Go over your writing, slowly and carefully, with the white paint pen. Allow to dry thoroughly.
9. Repeat the process of steps 8 & 9 with the days of the week across the top of the grid.
10. Following the directions on your chalkboard paint (WAITING TIMES VARY), prime the canvas for use as a chalkboard by rubbing a piece of chalk, on its side, across the entire surface, and then erasing. My paint recommended waiting at least 24 hours after the second coat of chalkboard paint was applied to do this.
11. Fold the top of your canvas over the dowel to the desired length. Stitch the fold together on either side, just beneath the dowel to hold it in place.
12. Tie your twine or string to each end of the dowel in the desired length.
13. Fill in the 1 inch squares with numbers using chalk. (See the tip below!)
14. Hang and enjoy!
TIP: If you sharpen your chalk in a mechanical pencil sharpener, you can write much smaller and more precisely.
linking to: Made By You Monday @ Skip to My Lou | Keep Calm Craft On @ Frontier Dreams
* * * get your F R E E P R I N T A B L E B L O G P L A N N E R here * * *

Love it!
thank you!
Looks great! Does the paint chip at all?
Thank you. We’ve been using it for about a month and haven’t had any problems with paint chipping.
Reblogged this on mardyaningsih.
oh my. i found you via made by you monday. love the calendar, but more importantly, i love your blog, your words…..”grace heaped higher than the laundry”…. what a great picture of His love. so glad to find you and i will definitely be back.
Pingback: Un calendrier en ardoise DIY | DIY Loisirs Créatifs My Diy
This is a great idea! And I had no idea one could sharpen chalk. Will have to try that. Apparently there are chalk pens, as well, which might come in handy for writing small?
I saw this link on apartment therapy and think this is so great! I might have to make one for myself this weekend!
You calendar turned out just beautiful, love that idea – thanks!